Wednesday 17 June 2009

15min project

In the midst of doing several other things Wednesday I decided to make the glass that I am using as a pen holder into something a little more special. So I dug out the glass paint, found some suitable stickers and and within minutes it was done!

Spray glass paint gives a really nice finish over large areas as you don't get brush marks and stickers work really well as a mask to create patterns. I used a frosting spray rather than coloured glass paint.

How To
  1. Clean the glass with soap, and dry it thoroughly
  2. Arrange the stickers and make sure they are stuck down well
  3. Spray the glass, I did 2 thin coats
  4. When it is dry peel the stickers off

Tips
  • Follow the instructions for how long you need to shake the tin and how far to hold it away from your glass.
  • The biggest mistake is to hold the spray paint too close to the glass, that makes the paint too thick and then it runs.
  • I have found with glass spray paints it is much better to do a couple of thin coats, that way you get a nice even finish without runs
  • Stickers work really for making patterns as they are regular and they are all ready sticky
  • Ware gloves - you will get it on your hands!
This really did only take 15mins, It took me longer to take the photos and write the blog!

Friday 27 March 2009

bag workshop upate

The last bag making workshop went really. I am always really pleased when new people turn up and we made another 4 bags to add to the Sew n' Sew total.

Githa brought some lovely material and had some great ideas. In the end she settle on a denim bag with a panel made out of antique kimono. The denim was from an old skirt and we use the panels that it was made from a feature and guide for the panel. She also altered the handle length so it could be used over her shoulder. Putting a gusset in the bottom tested out combined knowledge and in the end I called the oracle. Getting 3D sewing instructions over the phone was just as much of a challenged!

Melanie brought an old sweat shirt, which we turned into a surprisingly nice bag. Stretchy knit material it not a good one to start with your unfamiliar with a sewing machine as it stretches, and it is definitely not what you want to use for handles! But with the addition of some cotton handles in a contrasting colour Melanie made a really fantastic looking bag and because the pattern used french seams it will be strong too.

We have been lugging the laundry down the garden to the line in a a variety of carries bags than never last long. So after everyone went I made a huge bag for laundry that is big enough to get in!

It was a really creative workshop with everyone making something new and bringing their own personality and flair to the bags they made. The shopping bag pattern is very versatile and I loved getting my brain round how to modify it and help everyone realise their ideas.

Tuesday 24 March 2009

almond face scrub

For some reason I have a spotty chin! I want remedy this so I looked for a recipe to make a face scrub but in the end I made one up.

I always loved face masks from Lush, they felt home made, which satisfied my need for natural, chemical free products, and they felt somehow luxuriant. Maybe that had something to do with the price but partly I think, it was because they were obviously made of 'real' things, like fruit and chocolate.

I've had a recipe book for making beauty product for a while and got another for chritsmas. Somehow I could never bring my self to make the products as it always seamed such a 'waste' of good fruit!

I have reframed my outlook on making beauty products over the past few months. I am enjoying the creation process as well letting my self use good quality food for cosmetics. Making this quick easy, face scrub, for a specific reason (my spotty chin) was a real eye opener. It is so easy and it felt very every bit as luxuriant to use as anything from Lush

This recipe is really quick to make and is made from ingredients you are likely to have in the store cupboard. It has honey for its anti bacterial action, milk powder for a moisturiser and almonds as a mild exfoliate to loosen grime and dead skin cells. It makes your skin feel really soft and smooth and if you have chapped lips you can gently rub this over your lips too.
  • level tsp ground almonds
  • level tsp milk powder
  • level tsp honey
Mix all the ingredients into a past (you might want a drop of water depending on how runny your honey is) massage into wet skin for a few mins and if you have time leave for 5mins then wash off with warm water.

If you want to make this as a real treat your could add a splash of rose water.

Friday 13 March 2009

next workshop

sociable sewing

Come and learn how to make reusable shopping bags and recycle some old fabric while you are at it!

One cotton shopping bag can eliminate 100's of plastic ones over its life time. Bags are easy to make; I'll provide sewing machines, help and instructions, thread, material and cups of tea - you'll bring your self, a sense of fun, old material (if you have some) and some biscuits to share.

Saturday 14th March
Cambridge, UK
13:00 - 17:00

Leave a comment on this post and I'll send you details (if you don't want me to publish your details on the blog let me know)

Thursday 12 March 2009

Silk Tie

Last year I got some silk paints for Christmas. I had a little play with them and have been looking for something else to try them out on. Marks birthday gave me the excuse I needed.

I had a blank white silk tie and an idea for fish, in a Japanese water colour style. So after researching some images from the web, I drew around the tie so I had the exact proportions and tried out a few sketches.

I wanted a flowing shape and the soft watercolour techniques work well with silk paints, but the paint spreads a lot so you need to use special outliner. It comes in a tube and stops the paint spreading. As I didn't want it to look like a kids drawing with a heavy outline, I thought about what parts of the fish I could get away with not outlining. The body needed to be out lined but the fins only needed a hint of shape, it wouldn't matter if the colour for them spread. In fact I let the spread of the paint dictate to some extent the shape of the fins, you can always add more details with the outliner once the paint is dry.

I penciled in the rough outlines of the fish then used the outliner. I didn't bother penciling the blossom as I was happy for that to be free hand. Start at the top and work down so you don't smudge it. When it is dry start adding colour into the fish. I tried out a few small fish on the back (thin bit of the tie) to see how it all worked!

The background was done with a big brush and I mixed the colours as I went adding water with the brush to dilute it in places. In some areas I sprinkled sea salt crystals over the wet paint to draw out the colour and give a speckled effect. I did the background pretty much in one go so I didn't get any hard edges in the colour.

Once it was all dry I added a few tiny details to the fins with the silver outliner.

Colours
I used a silver outliner for the fish and purple/silver for the blossom. I used only burnt orange and yellow for the fish, pink and a hint of lavender for the blossom, dark blue, green and burnt orange for the background water. The orange brings the blue and green down a shade and ties in the orange from the fish. The blossom was kept very pale.

  1. Draw the main shape very lightly in pencil
  2. Apply the outliner in long even strokes and let dry (be patient and resist poking it!)
  3. Apply paint, starting inside your shapes and with light colours, then moving to darker colours and the background
  4. Add any more defining detail with outliner when it is dry
  5. Iron on cotton setting. I put a cloth over the silk when I ironed the front to protect it a little. The heat sets the paint and makes it washable.
Before getting started I consulted the oracle as she had made some lovely ties as christmas presents. So here are her tips and some things I learnt along the way.

Tips
  • Dip your brush in clean water first then shake out. This stops the paint going up into the ferrule and being wasted and makes the brush easier to clean.
  • You can dip your brush in clean water and use that to "push" the paint around on the silk and dilute colours if need be. It can also make a nice dappled effect.
  • Colours can be diluted with water. Either mix them on a palette, use a wet brush to pick up the colour, or spray the silk with clean water first.
  • The paint spreads, so put your brush near the edge of the area to be painted not right up to it.
  • The paint will spread a lot further on wet or thin silk
  • Colours will bleed into each other and mix. So use an outliner to create clean shapes and keep colours separate. Use the bleeding to your advantage to create mixed colours and patterns.
  • Use small pots or jar lids to mix the paint in
  • If you use the outliner too thinly or there is the slightest break in it, the paint will bleed.
  • Wet on wet = mixing ie wet paint next to wet paint will bleed into each other.
  • Dry on dry = harder edges, let one colour dry before painting another next to it if you want harder edges without using an outliner. There will still be some mixing.
  • Use a fat brush for big areas
  • You'll find some colours act differently. My burnt orange has a high pigment and 'stays' put where as my pink bleeds and spreads not matter what I do.
Silk painting is like water colour painting, it is loose and fairly abstract so don't worry about it spreading into unexpected places, jut go with the flow!

Wednesday 4 February 2009

Inkscape paper portrait

When I was younger I used to make pictures by cutting it out of layers of coloured paper instead of using crayons or paints. I've been scanning all my pretty papers and decided to try out the same idea using Inkscape instead of scissors.

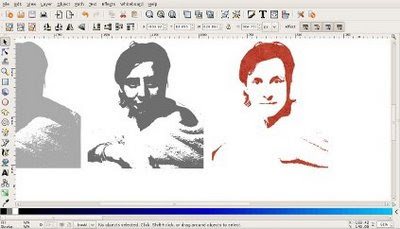
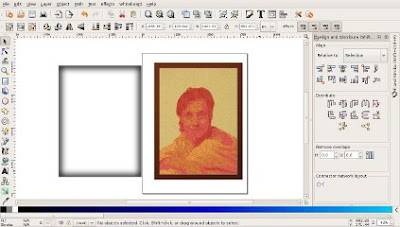
By using the trace bitmap function in Inkscape the picture is broken down into layers that can be "cut out" of scanned paper.

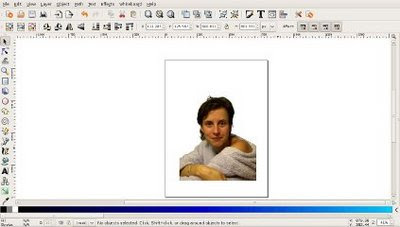
The first thing is to find a nice picture, you want some shadows but not big areas of dark shadow. To make the finished picture clearer remove the background, I used the Gimp for this. Then open the picture in Inkscape.


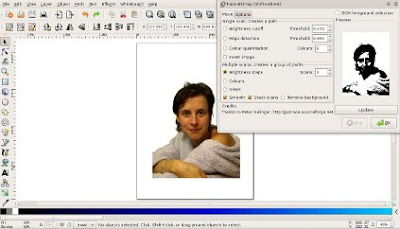
With the pictures selected, go to the path menu, and choose trace bitmap. This will bring up a new window, chose brightness steps, make the scans 4, check smooth and stack scans. Click update for a preview and ok when you are happy it.


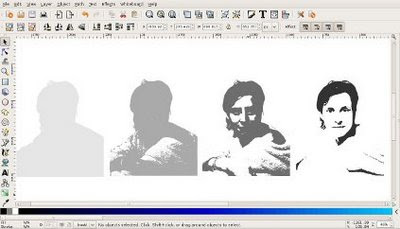
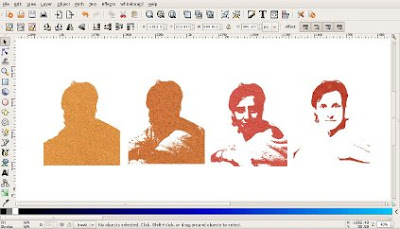
You will now have a new set of black and white layers on top of your photo. Click un-group, then separate the layers. You can delete the photo if you want or just move it to one side.


Open the first paper that you will use for the darkest layer (obviously make this a dark coloured paper!) and put it over your darkest scan. Your paper needs to be below the scan so click page down to lower it.


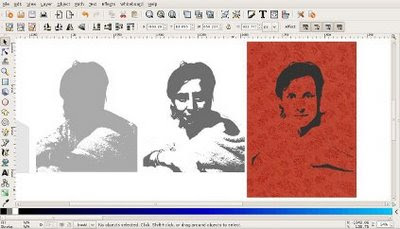
Select both the scan and the paper, then go to the object menu, clip, set. You'll now have your scan cut out of the paper.


Do this for all of your scans.


Put all the layers back on top of each other in the right order, darkest on top. Then to align them easily select all of your scans, then open the align dialogue box by going to the object menu, and choosing align. Make sure you have relative to: selection chosen. Choose centre on vertical axis and then align tops to get all the scans aligned.


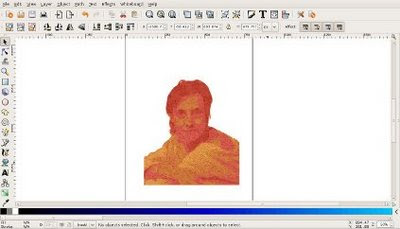
Select all the scans and group them together. To finish the picture I used another paper for the background and made a frame. For the frame, make a rectangle of the size you want, turn off the fill and make a thick stroke, I chose 40px. To give the frame some interest I filled it with a gradient.

To make the inside shadow copy the frame and move the copy to one side so you can see what you are doing. Duplicate the frame then change the colour of the new frame to black. Blur the new black frame by about 8%.


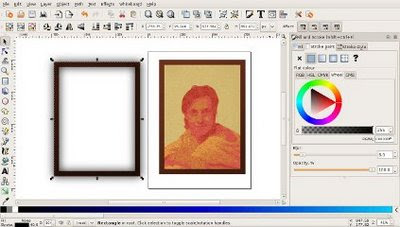
Lower the blurred frame to the bottom by clicking page down, then with both frames selected, go to object, clip, set.


Now align the shadow with the frame, do this by hand, bringing the shadow up above the picture and background layers if necessary...

...and there you have it!

Friday 23 January 2009

new bath cube recipe

I have always loved one of Lush's bath bombs that has coco butter in, so I thought I'd make up a recipe of my own.

  • 1 part citric acid
  • 2 parts bicarbonate of soda
  • small chippings of coco butter (as much or little as you want)
  • essential oils (roughly 2 tsp per cup of bicarb)
  • heather flowers (if you want!)

First thoroughly mix the citric acid and bicarb together then chop the coco butter. I found if I used a sharp knife and cut it thinly, it kind of crumbled into fine pieces. I also cut some into small chunks. As I use an ice cube tray as a mould, I wanted the chunks to be small so they still stuck together. If you use big moulds you could have bigger chunks.

I guessed the amount of coco butter. I didn't want them to be very oily, just enough to make your skin soft. I think 2 tablespoons per cup of bicarb would be fine. Mix it into the citric acid and bicarb mixture.

Add your essential oils and mix them in thoroughly and quickly. I love the smell of coco butter and think it works well with vanilla, but if you are not using much coco butter it won't add much smell to the mix. Getting the texture right can be a bit hit and miss, I press the mixture with the back of a spoon then cut it with the spoon. If it leaves a solid mass and doesn't crumble it's damp enough. Other wise spritz it lightly with some water.

Work quickly to press the mixture into ice cube trays. In this case I stuck with a regular shaped tray, I wasn't sure the lumpy mix would work with stars or other shapes.

Half way though I had a bit of a brain storm and put a thin layer of heather flowers into the bottom of one cube, then filled it up with the mix. I wasn't sure the heather would stick but when I turned them out it had made a really pretty layer of flowers on the top. I wish I had made them all like that now!

Monday 5 January 2009

tagging


We took our decorations down early to get some decorating done, so I thought it was time to make the Christmas cards into tags for next year. I really enjoyed using last years home made tags.

It is really nice to reuse cards and not just put them into the recycling. It is also a nice process, as Corrina said, it's great to take time and to get into the detail of the cards. You don't need to use the whole picture, maybe just the words or a part of the pattern. And you don't need to stick to squares either. I have great oval cutter that is just the right size, but you could make round tags by drawing around a jar and because a jar is see through it will be easy to position where you want.

The other thing you can do to jazz them up a bit is use scissors that cut patterns, I have some that cut a scalloped edge and some that make a ziz zag. You can normally pick them up cheap in the kids section of craft shops or stationers. You don't even have to use them on all of the edges, I made some long thin tags and did the zig zag on just one short end.

If you are punching holes into them for ribbon remember to leave room when you are cutting them out! I leave the ribbon until I come to wrap the presents, I never know what colour to use until nearer the time.