I love this hat pattern by Rae, I just whipped up another for Grace and I'll do one for Rose too, matching hats for Christmas! It is such an easy pattern and so cozy. I am a bit short on fleece but I do have some of the plush fabric from Grace's dressing gown. I love the way the plush sticks out under the fleece, the only problem is that it sheds fluff everywhere.
Rae's pattern is easy but I used Zaaberriy's tip to get rid of the seam at the front. Hopefully I'll get photos of the girls wearing them at Christmas.
Sunday, 15 September 2013
dolly
I have had this lovely doll pattern for ages, long before I had a little girl. Grace loves dolls now so it seamed like the perfect time to make it. It was quite easy to make and lots of fun. I particularly like how her elbows and knees bend.
I made a few tweaks to make it more toddler proof like sewing the two flower hair pieces together before stitching them on.
And I embroidered the face rather than paint it. Which to be honest was a bit nerve wracking but I think has turned out ok. Also Grace loves to put on and take off clothes so I made her a proper skirt rather sew it on to her body.
Grace loves her, although so far she is just called dollllliiiiy!
I made a few tweaks to make it more toddler proof like sewing the two flower hair pieces together before stitching them on.
And I embroidered the face rather than paint it. Which to be honest was a bit nerve wracking but I think has turned out ok. Also Grace loves to put on and take off clothes so I made her a proper skirt rather sew it on to her body.
Grace loves her, although so far she is just called dollllliiiiy!
Sunday, 28 July 2013
lavender bomb
I haven't made one of these in years, it's a nice way to make a pretty lavender bag and use up some ribbon.
You need an odd number of fresh, long lavender stems, I used nine. Pick them on a sunny day so the flowers dry. Tie them together to make bunch, shuffle them about so you get a longish bunch.
Fold the stalks back on them selves to make a cage over the flowers and even out the 'bars'.
Hold the stems quite firmly and start weaving the ribbon in and out of the stems. Do this by releasing one stem at a time, try not to bend the stems. Pull the ribbon quite tight, and keep the rows close together, you want to keep all the flowers in as they dry.
Keep going until you have covered all the flowers then tie off the ribbon.
Use another piece of ribbon for a bow and add a hanging loop if you want.
I used 8mm ribbon. If you use more stems and make a bigger bunch you might want to use a wider ribbon.
You need an odd number of fresh, long lavender stems, I used nine. Pick them on a sunny day so the flowers dry. Tie them together to make bunch, shuffle them about so you get a longish bunch.
Hold the stems quite firmly and start weaving the ribbon in and out of the stems. Do this by releasing one stem at a time, try not to bend the stems. Pull the ribbon quite tight, and keep the rows close together, you want to keep all the flowers in as they dry.
Keep going until you have covered all the flowers then tie off the ribbon.
Use another piece of ribbon for a bow and add a hanging loop if you want.
I used 8mm ribbon. If you use more stems and make a bigger bunch you might want to use a wider ribbon.
new trousers
I couldn't resist these picks of Grace enjoying her new trousers. Thanks to Mark for taking them, she is a hard one to take photos of, never keeps still for very long.
Monday, 8 July 2013
more tousers
To make up for buying yet more material I made Grace a pair of trousers out of a sheet, a duvet cover and some curtains. They were supposed to be a quick job but I got carried away with the pockets.
The pockets are lined and top stitched in to place. To give them a piped look I rolled the lining to the outside edge and pressed it so it showed.
The pockets are lined and top stitched in to place. To give them a piped look I rolled the lining to the outside edge and pressed it so it showed.dressing gown
I made an earlier promise to my self to work through my stash with out buying new material, so I was very pleased with my self for using an old towel to make Grace a new hooded towel and to make Bean a new body. So pleased that I brought some more material. I couldn't resist Dunelm Mills sale. They had fab striped snuggle blanket for £7.99 and at 177cm x 228cm it seamed like a good deal for lovely fabric.
I thought it would make a great dressing gown for Grace, her current one barely covers her bum. I also thought I would use the old one as a template. I normally avoid making things with sleeves and I know there are a lot more complexities to making patterns than I have experience with so I am not sure why I thought this was a good idea.
To make the pattern I traced around her old gown, adding 2.5cm for seam allowance plus a bit growing room. It was all a bit hit and miss and I definitely needed to make a paper pattern rather than my normal trick of tracing directly on to fabric. I used some old tissue paper which was thin enough to see my cutting board lines through, which made tracing straight lines easy. It was a bit too thin though and didn't hold up to being pinned on to fabric very well.
I wasn't sure how easy it would be to work with the fabric so I started with the belt. I made the belt in two pieces that are sewn in to the side seams. That way she can't loose the belt. To make them I sewed a tube, turned it right sides out and top stitched. A slightly longer stitch than normal seamed to work best. You can't see the stitches of the top stitching, it leaves a dent.
As the fabric is so soft on both sides I didn't want to line the hood. That meant I needed a nicely finished seam for the centre. To do this I sewed the hood pieces right sides together with about 3cm seam allowance then trimmed one side down. The longer seam allowance is turned under once and pined in place so it covers the short seam allowance. As I couldn't iron it, it was all done pretty much by feel. Then I top stitched, from the wrong side, as close to the folded edge as I could.

This gives a nice flat, neatly finished seam. Inside hood is on the left.
Sleeves can be tricky enough at the best of times without making small versions for childrens clothes. The advantage of this fabric is that being a knit, it is stretchy so I didn't need to worry about puckers in the sleeve. I thought the easiest way to make them was to stitch the shoulder seam, then put the sleeve in. I pinned from the centre out, right sides together. Once that was done I sewed the the side seam (with the belt pinned in) all the way up to the armpit and along the sleeve.
It was at this point I realised that I had made the back far too wide.Even allowing for some growing room it was too much. I really didn't feel like unpicking the sleeves and cutting a new back so that meant taking the back in. Although the fabric didn't fray it did need zigzagging on the raw edges. I thought that was going to look terrible, instead of cutting I just made a big fold and stitched up both sides. It ended up looking like the inside of the hood. It is a bit bulky but at least the fabric is soft.
Next I sewed the hood on to the neck. I am happy with the side seams and arms being zigzagged but the back of the neck needed to look and feel more comfortable. I trimmed the seam allowance down and covered it with a nice soft piece of satin bias tape.
To finish the front I folded over a nice wide hem all the way round the front of the gown and the hood. The hem covered the ends of the bias tape. It took a bit of fiddling and trimming to get it right. I folded the same size hem around the bottom and stitched both with a double row of top stitching. Grace likes pockets so I made two large patch pockets on the front.
I'd love to have photos of Grace in her new gown, but she refuses point blank to wear it. Oh well, it's plenty big enough so I'm hoping she grow to like it at some point.
I thought it would make a great dressing gown for Grace, her current one barely covers her bum. I also thought I would use the old one as a template. I normally avoid making things with sleeves and I know there are a lot more complexities to making patterns than I have experience with so I am not sure why I thought this was a good idea.
To make the pattern I traced around her old gown, adding 2.5cm for seam allowance plus a bit growing room. It was all a bit hit and miss and I definitely needed to make a paper pattern rather than my normal trick of tracing directly on to fabric. I used some old tissue paper which was thin enough to see my cutting board lines through, which made tracing straight lines easy. It was a bit too thin though and didn't hold up to being pinned on to fabric very well.
I wasn't sure how easy it would be to work with the fabric so I started with the belt. I made the belt in two pieces that are sewn in to the side seams. That way she can't loose the belt. To make them I sewed a tube, turned it right sides out and top stitched. A slightly longer stitch than normal seamed to work best. You can't see the stitches of the top stitching, it leaves a dent.
As the fabric is so soft on both sides I didn't want to line the hood. That meant I needed a nicely finished seam for the centre. To do this I sewed the hood pieces right sides together with about 3cm seam allowance then trimmed one side down. The longer seam allowance is turned under once and pined in place so it covers the short seam allowance. As I couldn't iron it, it was all done pretty much by feel. Then I top stitched, from the wrong side, as close to the folded edge as I could.

This gives a nice flat, neatly finished seam. Inside hood is on the left.
Sleeves can be tricky enough at the best of times without making small versions for childrens clothes. The advantage of this fabric is that being a knit, it is stretchy so I didn't need to worry about puckers in the sleeve. I thought the easiest way to make them was to stitch the shoulder seam, then put the sleeve in. I pinned from the centre out, right sides together. Once that was done I sewed the the side seam (with the belt pinned in) all the way up to the armpit and along the sleeve.
It was at this point I realised that I had made the back far too wide.Even allowing for some growing room it was too much. I really didn't feel like unpicking the sleeves and cutting a new back so that meant taking the back in. Although the fabric didn't fray it did need zigzagging on the raw edges. I thought that was going to look terrible, instead of cutting I just made a big fold and stitched up both sides. It ended up looking like the inside of the hood. It is a bit bulky but at least the fabric is soft.Next I sewed the hood on to the neck. I am happy with the side seams and arms being zigzagged but the back of the neck needed to look and feel more comfortable. I trimmed the seam allowance down and covered it with a nice soft piece of satin bias tape.
To finish the front I folded over a nice wide hem all the way round the front of the gown and the hood. The hem covered the ends of the bias tape. It took a bit of fiddling and trimming to get it right. I folded the same size hem around the bottom and stitched both with a double row of top stitching. Grace likes pockets so I made two large patch pockets on the front.
I'd love to have photos of Grace in her new gown, but she refuses point blank to wear it. Oh well, it's plenty big enough so I'm hoping she grow to like it at some point.
Monday, 10 June 2013
baby bean
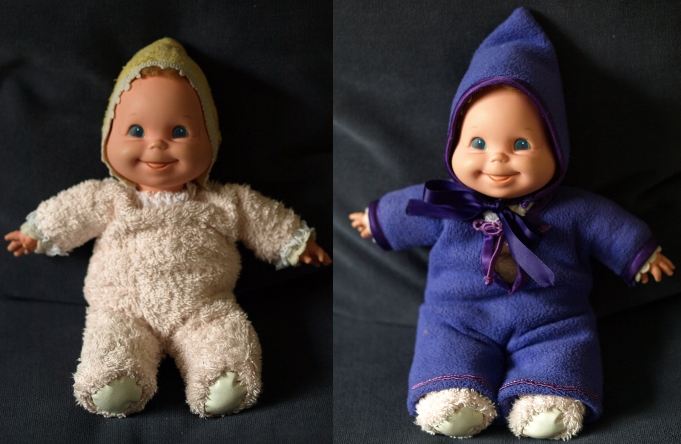
Baby bean is my all time favourite toy. She has been with me since I was born and she has been very well loved. Once upon a time she had a yellow towelling body and a cute blond curl. The curl went many years ago (I had a hair cut, so it stood to reason that Bean should get a hair cut).
Bean came with me when we went on holiday and over the years it became tradition. She went to university with me and a few years later she came travelling with me. Her much hugged and cuddled body got pretty thread bare and she gradually became more darning than towelling. I've made her several set of new clothes, the first was hand stitched out of an old t-shirt one afternoon in a beach hut on Kho Tao.
Bean has always been in Graces room but I knew she wouldn't stand up to the tough love of a toddler. Somehow I thought she would sit on a shelf and look nice but very quickly Grace decided Bean was for cuddling and there was no going back to sitting on a shelf.
When I dared to take Beans clothes off she had several new holes and I knew it was time for drastic action. So in keeping with my decision not to buy any more fabric I used some pink towel scraps to make her a new body. It needed to be something that took the strain in a way that clothes were not doing but I didn't want to completely take her apart. Instead I made her a tight fitting new suit and hand sewed it to her neck, wrists and feet. The only way I could get her in was to make a slash neck and hand stitch it up tight around her neck.
Making the suit its self only took about 15mins, all the hand stitching took about an hour and a half. I added a bit of lace around her wrists and neck partly to cover up the rather grey original lace trim (I didn't want to lose any more of her original self) and partly because I couldn't resist.
Grace saw her half way through the transformation and demanded that she go back in her purple suit so for now I haven't made her a matching pink hood, but it is one the cards.
Bean came with me when we went on holiday and over the years it became tradition. She went to university with me and a few years later she came travelling with me. Her much hugged and cuddled body got pretty thread bare and she gradually became more darning than towelling. I've made her several set of new clothes, the first was hand stitched out of an old t-shirt one afternoon in a beach hut on Kho Tao.
Bean has always been in Graces room but I knew she wouldn't stand up to the tough love of a toddler. Somehow I thought she would sit on a shelf and look nice but very quickly Grace decided Bean was for cuddling and there was no going back to sitting on a shelf.
Making the suit its self only took about 15mins, all the hand stitching took about an hour and a half. I added a bit of lace around her wrists and neck partly to cover up the rather grey original lace trim (I didn't want to lose any more of her original self) and partly because I couldn't resist.
Grace saw her half way through the transformation and demanded that she go back in her purple suit so for now I haven't made her a matching pink hood, but it is one the cards.
Subscribe to:
Posts (Atom)