It has taken me a while to write this as my new niece Ciara is now a couple of months old now. As usual I didn't have it done in time for her birth but I did manage to get it done a little quicker than Jaspers book.
Kind of a farm yard animal theme this time, I had fun with the pig and cow tails.
Showing posts with label baby. Show all posts
Monday, 21 April 2014
Sunday, 12 January 2014
trouser mad
I've gone a bit trouser made over the past few months. Grace has been growing fast and suddenly it was winter and she had no warm trousers that were long enough. I wanted a nice simple two piece trouser pattern and I know Rae makes some nice patterns so I bought her parsley pants pattern.
Now she does say it is a slim fitting pattern but Grace is pretty much in big girl pants now so I thought I be ok. The first pair I made are these lovely moleskin ones with pin tucks. Unfortunately the pin tucks just make them too narrow to get over her chubby thighs, even without nappies. They do fit but she complains they are tight.

I've had acres of the moleskin for ages and I am on a mission to use up some of my stash. It doesn't wash very well, as you can see but it is warm.
So the second pair had to be out of the moleskin too as it is so cozy. I couldn't bring my self to make a repeat pair, even though I love the pin tucks, so I went for different pockets. I added an extra inch to the width and they are a much better fit. It also made me happy that the pockets used up some small scraps.

The third pair are super cozy and made of fleece. In my mind I have huge amounts of fleece, but when I came to make these I realised that I don't have any big pieces any more. Which is why they have one orange leg at the back and orange cuffs. I might not have chosen to make them that way but I think they have turned out pretty funky, and did I mention they are so cozy!

The fourth pair are from Rae's big butt baby pants, another great pattern and super easy to make. I caved in and bought this fabric before Christmas, how could I refuse! These trousers are a Christmas present for my great nephew (penny if you are reading this close your eyes). He doesn't have them yet and he growing hugely, I hope they still fit when he gets them!
Now she does say it is a slim fitting pattern but Grace is pretty much in big girl pants now so I thought I be ok. The first pair I made are these lovely moleskin ones with pin tucks. Unfortunately the pin tucks just make them too narrow to get over her chubby thighs, even without nappies. They do fit but she complains they are tight.

I've had acres of the moleskin for ages and I am on a mission to use up some of my stash. It doesn't wash very well, as you can see but it is warm.
So the second pair had to be out of the moleskin too as it is so cozy. I couldn't bring my self to make a repeat pair, even though I love the pin tucks, so I went for different pockets. I added an extra inch to the width and they are a much better fit. It also made me happy that the pockets used up some small scraps.

The third pair are super cozy and made of fleece. In my mind I have huge amounts of fleece, but when I came to make these I realised that I don't have any big pieces any more. Which is why they have one orange leg at the back and orange cuffs. I might not have chosen to make them that way but I think they have turned out pretty funky, and did I mention they are so cozy!

The fourth pair are from Rae's big butt baby pants, another great pattern and super easy to make. I caved in and bought this fabric before Christmas, how could I refuse! These trousers are a Christmas present for my great nephew (penny if you are reading this close your eyes). He doesn't have them yet and he growing hugely, I hope they still fit when he gets them!
Monday, 8 July 2013
dressing gown
I made an earlier promise to my self to work through my stash with out buying new material, so I was very pleased with my self for using an old towel to make Grace a new hooded towel and to make Bean a new body. So pleased that I brought some more material. I couldn't resist Dunelm Mills sale. They had fab striped snuggle blanket for £7.99 and at 177cm x 228cm it seamed like a good deal for lovely fabric.
I thought it would make a great dressing gown for Grace, her current one barely covers her bum. I also thought I would use the old one as a template. I normally avoid making things with sleeves and I know there are a lot more complexities to making patterns than I have experience with so I am not sure why I thought this was a good idea.
To make the pattern I traced around her old gown, adding 2.5cm for seam allowance plus a bit growing room. It was all a bit hit and miss and I definitely needed to make a paper pattern rather than my normal trick of tracing directly on to fabric. I used some old tissue paper which was thin enough to see my cutting board lines through, which made tracing straight lines easy. It was a bit too thin though and didn't hold up to being pinned on to fabric very well.
I wasn't sure how easy it would be to work with the fabric so I started with the belt. I made the belt in two pieces that are sewn in to the side seams. That way she can't loose the belt. To make them I sewed a tube, turned it right sides out and top stitched. A slightly longer stitch than normal seamed to work best. You can't see the stitches of the top stitching, it leaves a dent.
As the fabric is so soft on both sides I didn't want to line the hood. That meant I needed a nicely finished seam for the centre. To do this I sewed the hood pieces right sides together with about 3cm seam allowance then trimmed one side down. The longer seam allowance is turned under once and pined in place so it covers the short seam allowance. As I couldn't iron it, it was all done pretty much by feel. Then I top stitched, from the wrong side, as close to the folded edge as I could.

This gives a nice flat, neatly finished seam. Inside hood is on the left.
Sleeves can be tricky enough at the best of times without making small versions for childrens clothes. The advantage of this fabric is that being a knit, it is stretchy so I didn't need to worry about puckers in the sleeve. I thought the easiest way to make them was to stitch the shoulder seam, then put the sleeve in. I pinned from the centre out, right sides together. Once that was done I sewed the the side seam (with the belt pinned in) all the way up to the armpit and along the sleeve.
It was at this point I realised that I had made the back far too wide.Even allowing for some growing room it was too much. I really didn't feel like unpicking the sleeves and cutting a new back so that meant taking the back in. Although the fabric didn't fray it did need zigzagging on the raw edges. I thought that was going to look terrible, instead of cutting I just made a big fold and stitched up both sides. It ended up looking like the inside of the hood. It is a bit bulky but at least the fabric is soft.
Next I sewed the hood on to the neck. I am happy with the side seams and arms being zigzagged but the back of the neck needed to look and feel more comfortable. I trimmed the seam allowance down and covered it with a nice soft piece of satin bias tape.
To finish the front I folded over a nice wide hem all the way round the front of the gown and the hood. The hem covered the ends of the bias tape. It took a bit of fiddling and trimming to get it right. I folded the same size hem around the bottom and stitched both with a double row of top stitching. Grace likes pockets so I made two large patch pockets on the front.
I'd love to have photos of Grace in her new gown, but she refuses point blank to wear it. Oh well, it's plenty big enough so I'm hoping she grow to like it at some point.
I thought it would make a great dressing gown for Grace, her current one barely covers her bum. I also thought I would use the old one as a template. I normally avoid making things with sleeves and I know there are a lot more complexities to making patterns than I have experience with so I am not sure why I thought this was a good idea.
To make the pattern I traced around her old gown, adding 2.5cm for seam allowance plus a bit growing room. It was all a bit hit and miss and I definitely needed to make a paper pattern rather than my normal trick of tracing directly on to fabric. I used some old tissue paper which was thin enough to see my cutting board lines through, which made tracing straight lines easy. It was a bit too thin though and didn't hold up to being pinned on to fabric very well.
I wasn't sure how easy it would be to work with the fabric so I started with the belt. I made the belt in two pieces that are sewn in to the side seams. That way she can't loose the belt. To make them I sewed a tube, turned it right sides out and top stitched. A slightly longer stitch than normal seamed to work best. You can't see the stitches of the top stitching, it leaves a dent.
As the fabric is so soft on both sides I didn't want to line the hood. That meant I needed a nicely finished seam for the centre. To do this I sewed the hood pieces right sides together with about 3cm seam allowance then trimmed one side down. The longer seam allowance is turned under once and pined in place so it covers the short seam allowance. As I couldn't iron it, it was all done pretty much by feel. Then I top stitched, from the wrong side, as close to the folded edge as I could.

This gives a nice flat, neatly finished seam. Inside hood is on the left.
Sleeves can be tricky enough at the best of times without making small versions for childrens clothes. The advantage of this fabric is that being a knit, it is stretchy so I didn't need to worry about puckers in the sleeve. I thought the easiest way to make them was to stitch the shoulder seam, then put the sleeve in. I pinned from the centre out, right sides together. Once that was done I sewed the the side seam (with the belt pinned in) all the way up to the armpit and along the sleeve.
It was at this point I realised that I had made the back far too wide.Even allowing for some growing room it was too much. I really didn't feel like unpicking the sleeves and cutting a new back so that meant taking the back in. Although the fabric didn't fray it did need zigzagging on the raw edges. I thought that was going to look terrible, instead of cutting I just made a big fold and stitched up both sides. It ended up looking like the inside of the hood. It is a bit bulky but at least the fabric is soft.Next I sewed the hood on to the neck. I am happy with the side seams and arms being zigzagged but the back of the neck needed to look and feel more comfortable. I trimmed the seam allowance down and covered it with a nice soft piece of satin bias tape.
To finish the front I folded over a nice wide hem all the way round the front of the gown and the hood. The hem covered the ends of the bias tape. It took a bit of fiddling and trimming to get it right. I folded the same size hem around the bottom and stitched both with a double row of top stitching. Grace likes pockets so I made two large patch pockets on the front.
I'd love to have photos of Grace in her new gown, but she refuses point blank to wear it. Oh well, it's plenty big enough so I'm hoping she grow to like it at some point.
Monday, 10 June 2013
baby bean
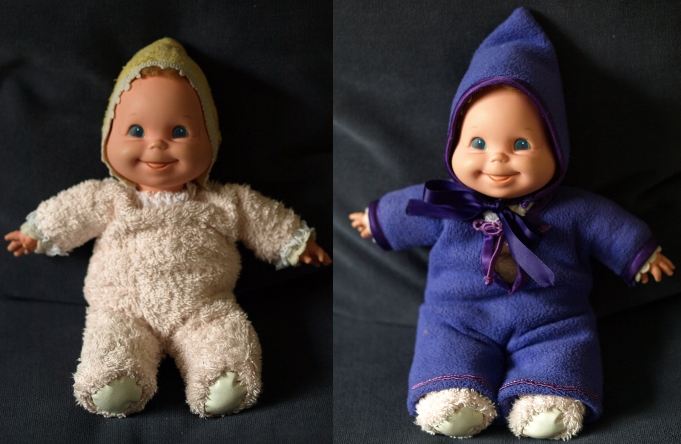
Baby bean is my all time favourite toy. She has been with me since I was born and she has been very well loved. Once upon a time she had a yellow towelling body and a cute blond curl. The curl went many years ago (I had a hair cut, so it stood to reason that Bean should get a hair cut).
Bean came with me when we went on holiday and over the years it became tradition. She went to university with me and a few years later she came travelling with me. Her much hugged and cuddled body got pretty thread bare and she gradually became more darning than towelling. I've made her several set of new clothes, the first was hand stitched out of an old t-shirt one afternoon in a beach hut on Kho Tao.
Bean has always been in Graces room but I knew she wouldn't stand up to the tough love of a toddler. Somehow I thought she would sit on a shelf and look nice but very quickly Grace decided Bean was for cuddling and there was no going back to sitting on a shelf.
When I dared to take Beans clothes off she had several new holes and I knew it was time for drastic action. So in keeping with my decision not to buy any more fabric I used some pink towel scraps to make her a new body. It needed to be something that took the strain in a way that clothes were not doing but I didn't want to completely take her apart. Instead I made her a tight fitting new suit and hand sewed it to her neck, wrists and feet. The only way I could get her in was to make a slash neck and hand stitch it up tight around her neck.
Making the suit its self only took about 15mins, all the hand stitching took about an hour and a half. I added a bit of lace around her wrists and neck partly to cover up the rather grey original lace trim (I didn't want to lose any more of her original self) and partly because I couldn't resist.
Grace saw her half way through the transformation and demanded that she go back in her purple suit so for now I haven't made her a matching pink hood, but it is one the cards.
Bean came with me when we went on holiday and over the years it became tradition. She went to university with me and a few years later she came travelling with me. Her much hugged and cuddled body got pretty thread bare and she gradually became more darning than towelling. I've made her several set of new clothes, the first was hand stitched out of an old t-shirt one afternoon in a beach hut on Kho Tao.
Bean has always been in Graces room but I knew she wouldn't stand up to the tough love of a toddler. Somehow I thought she would sit on a shelf and look nice but very quickly Grace decided Bean was for cuddling and there was no going back to sitting on a shelf.
Making the suit its self only took about 15mins, all the hand stitching took about an hour and a half. I added a bit of lace around her wrists and neck partly to cover up the rather grey original lace trim (I didn't want to lose any more of her original self) and partly because I couldn't resist.
Grace saw her half way through the transformation and demanded that she go back in her purple suit so for now I haven't made her a matching pink hood, but it is one the cards.
Wednesday, 5 June 2013
ruffle butt trousers
I have been itching to make Rae's big but baby pants with ruffles on the bum. But I have decided that I am not allowed to buy any more fabric, despite being in love with Dunelm Mill's maritime fabric (I am sure there is a dress for Grace just waiting to be made from it). I have huge amounts of fabric and lace so all of my next projects will be made out of what I have in an attempt to reduce my stash.
They have turned out a bit Austin Powers but luckily Grace doesn't care!
Sunday, 19 May 2013
shirt peasant dress
I've had an old shirt of Marks lurking in my stash for a while now. It is a lovely soft Rayon with a brilliantly bold pattern but the button holes had all pulled through and Mark didn't want to wear it any more.
I found this great peasant dress tutorial by Sew Much Ado and thought it would be great with the fabric. Her pattern was for 0-3months and of course Grace was napping and time was short, so rather than do anything sensible like print out her pattern and scale it up, I guessed. I didn't even bother with making a paper pattern. This was not a great idea and as a result it's a bit wonky and rather long.
The first thing I did, after taking the pocket off, was sew up the button placket. As the button holes were all frayed I wasn't going to be able to use them anyway.
Then I cut out the dress pieces, I drew straight on to the fabric with washable marker and had several attempts at the shape. I lined up the centre front on the buttons and used the original hem as the hem of the dress.
I wanted to use the sleeves of the shirt for the sleeves of the dress but once I had opened them out I realized I was a bit short of material. As the hem of the sleeves was quite deep I used it as a ready made casing for the arm elastic. I tidied up the rough top edge once I'd sewn the arms in.
I ran a line of stitching up the middle of the hem to stop my thin elastic from twisting. That also gave the sleeves a nice little frill. But it meant I had to thread the elastic in the arms before stitching the side seams, not a huge problem I just tacked the ends of the elastic in place first to hold it.
Other than that I pretty much followed Sew Much Ado's tutorial.
I found this great peasant dress tutorial by Sew Much Ado and thought it would be great with the fabric. Her pattern was for 0-3months and of course Grace was napping and time was short, so rather than do anything sensible like print out her pattern and scale it up, I guessed. I didn't even bother with making a paper pattern. This was not a great idea and as a result it's a bit wonky and rather long.
The first thing I did, after taking the pocket off, was sew up the button placket. As the button holes were all frayed I wasn't going to be able to use them anyway.
Then I cut out the dress pieces, I drew straight on to the fabric with washable marker and had several attempts at the shape. I lined up the centre front on the buttons and used the original hem as the hem of the dress.I wanted to use the sleeves of the shirt for the sleeves of the dress but once I had opened them out I realized I was a bit short of material. As the hem of the sleeves was quite deep I used it as a ready made casing for the arm elastic. I tidied up the rough top edge once I'd sewn the arms in.
I ran a line of stitching up the middle of the hem to stop my thin elastic from twisting. That also gave the sleeves a nice little frill. But it meant I had to thread the elastic in the arms before stitching the side seams, not a huge problem I just tacked the ends of the elastic in place first to hold it.Other than that I pretty much followed Sew Much Ado's tutorial.
Sunday, 6 January 2013
bib
It suddenly dawned on me the other day as I was using an emergency disposable bib, that I could make one in the PVC fabric. The little toweling bibs are not big enough and the hard plastic ones don't pack up small enough.
I used the disposable bib as a template. I like it because you turn the bottom part back on its self and it makes a scoop. Great for catching dropped food. The only problem is because it gets flipped back you end up with the wrong side of the material at the front.
I didn't like the look of that so I made an extra turn up, that I hemmed and top stitched to keep it in place.
Once that was done I stitched the scoop, wrong sides together to the bib. The last thing I did was stitch a press stud to the neck. I am not sure how durable it will be. The seams look like they will get a lot of stress where it gets flipped back on its self. Normally I'd back stitch a few times, but this will just make an extra row of holes in the PVC. I did think about sewing some bias tape over the seams but it will end up in the scoop of the bib where it is going to get mucky with food. I'm not sure how strong the stitching for the press stud is going to be either. I figure we'll use it a few times and see how it works... it might be the prototype.
I used the disposable bib as a template. I like it because you turn the bottom part back on its self and it makes a scoop. Great for catching dropped food. The only problem is because it gets flipped back you end up with the wrong side of the material at the front.
Once that was done I stitched the scoop, wrong sides together to the bib. The last thing I did was stitch a press stud to the neck. I am not sure how durable it will be. The seams look like they will get a lot of stress where it gets flipped back on its self. Normally I'd back stitch a few times, but this will just make an extra row of holes in the PVC. I did think about sewing some bias tape over the seams but it will end up in the scoop of the bib where it is going to get mucky with food. I'm not sure how strong the stitching for the press stud is going to be either. I figure we'll use it a few times and see how it works... it might be the prototype.
Wednesday, 5 September 2012
pillowcase pants (and top)
Grace really does have an enormous bum in her big bum nappies and being the expert crawler that she is, trousers are much more practical than skirts. If you can get them big enough to go over the nappy!
I have had a hankering to make Rae's Big Butt Baby Pants pattern and then two fab pillowcases leapt out at me in the Salvation Army shop. Double sided contrasting materials, they were crying out to be made into trousers and a top.
Completely ignoring Rae's sound advice to make a test pair first, I launched into making the trousers with the turn ups. Luckily the pattern is easy to follow and I managed to get everything done, apart from the turn ups, in one of Grace's naps.
I made the 12-18moths size and the length is great, but are not quite as roomy as I'd hoped in the bum. Grace is a big un though.
For the top I roughly followed one of Graces current tops and even then only narrowly avoided making it too small. I wanted to try my hand at shirring and after consulting the Oracle and a few online tutorials I finally got it sorted. It's fab, great to baby clothes, I am all in favour of stretchy clothes that don't require me to make button holes or put in zips. I already have some ideas for more clothes with shirring!
Completely ignoring Rae's sound advice to make a test pair first, I launched into making the trousers with the turn ups. Luckily the pattern is easy to follow and I managed to get everything done, apart from the turn ups, in one of Grace's naps.
I made the 12-18moths size and the length is great, but are not quite as roomy as I'd hoped in the bum. Grace is a big un though.
Friday, 3 August 2012
towel time
There are many over priced, unnecessary baby gadgets in the world but baby towels, square ones with hoods, are actually a good idea. The right shape for wrapping a wriggly baby and the hood keeps little heads warm (and provides a good game of peek-a-boo).
As my amazonian child is growing at a vast rate, a bigger towel was needed. I had an old white bath sheet that I planned to re-use and lots of grand ideas for applique designs and coloured bias binding. In the end it turned into another can-I-get-this-done-before-she-wakes-up projects.
I cut the towel down to a square and cut the hood piece out of the remainder. I used a plate to get a nice curve on the top of the hood. As I was in time saving mode I used the already finished edge for the front of the hood and only put the bias binding down the two sides that held the hood in place. Not only did I get it done during a nap but I also had time to have a nice chat with a friend.
As my amazonian child is growing at a vast rate, a bigger towel was needed. I had an old white bath sheet that I planned to re-use and lots of grand ideas for applique designs and coloured bias binding. In the end it turned into another can-I-get-this-done-before-she-wakes-up projects.
Friday, 13 July 2012
pillowcase dress
I have been on the look out for clothes in charity shops that I can upcycle into clothes for Grace. But I can never bring my self to buy a perfectly good item and then cut it up. Plus it never seams to be good value to spend pounds, on something to cut up. But I have discovered that pillow cases are very cost effective. They are generally about 25p and have plenty of material for a dress.
I found a lovely white cotton pillowcase with a embroidered lace boarder for a whole 55p and it was my intention to make the simplest, quickest dress possible. I was just going to gather it at the neck and use bias binding for the arm holes and straps. But the more I thought about it the more I realized it would look so much nicer with a little bit of extra colour. A quick root through my hoard found the perfect thing and a scrap of white satin bias was perfect for the straps.
I'm really pleased with it, I think the pink flowered material for the front really sets it off. The only thing I'd change next time is the underarms as they are a bit bulky. Despite the extra work it was still really quick. I'll let someone else faff around making things with sleeves that are time consuming. Sleeveless dresses like this can be worn over long sleeved grows in the colder weather, which is just as well as we are not getting much of a summer this year.
reversible dress
It worked pretty well although I don't think the ribbon will stay done up long on Grace. I love the fact it cost so little to make. Pillowcases are dirt cheap and have plenty of material for a baby dress, and the strawberry material I already had.
I made this ages ago and have been meaning to take a photo but only ever remember when Grace is a sleep and the dress is in her room. She hasn't had chance to wear it as the weather has been grotty, She'll have to wear it over a long sleeved grow.
Saturday, 3 March 2012
dress
I've been mulling over how to make a quick dress for Grace for a while now. There are some lovely baby girl dress patterns but I wanted something supper quick as Grace doesn't give me a lot of time. She has a nice fleece dress that decided to copy. I think more baby clothes should be made in fleece, it's warm, stretchy, comes in great colours, doesn't fray and the sick and drool doesn't soak in!
I just traced round the dress to make the pattern, adding a 1.5cm seam allowance when I cut it out. This worked ok but I think to be more accurate I need to include seam allowance in the paper pattern. As it is fleece I decided to cut down on one line of stitching by not giving it a hem, just cut the fabric with pinking shears. I did the same on the front yoke to make it look more intentional.
The yoke is lined with material from an old t-shirt. I was able to save time by using the hem of the t-shirt as the hem of the yolk. The dress is those colours because I am using up my scraps of fleece. The photo doesn't show it but it's purple at the back. I added a couple of flowers to pull it all together (and to give Grace something to play with!).
It was really quick to make, I'll definitely be making another. The only thing I would change is to make the shoulder straps longer. Then I'd be able to move the buttons as she gets bigger and get some extra use out of it.
The colour is a bit off in this photo, but she looks fab in it.
I just traced round the dress to make the pattern, adding a 1.5cm seam allowance when I cut it out. This worked ok but I think to be more accurate I need to include seam allowance in the paper pattern. As it is fleece I decided to cut down on one line of stitching by not giving it a hem, just cut the fabric with pinking shears. I did the same on the front yoke to make it look more intentional.
The yoke is lined with material from an old t-shirt. I was able to save time by using the hem of the t-shirt as the hem of the yolk. The dress is those colours because I am using up my scraps of fleece. The photo doesn't show it but it's purple at the back. I added a couple of flowers to pull it all together (and to give Grace something to play with!).It was really quick to make, I'll definitely be making another. The only thing I would change is to make the shoulder straps longer. Then I'd be able to move the buttons as she gets bigger and get some extra use out of it.
The colour is a bit off in this photo, but she looks fab in it.
Saturday, 31 December 2011
blanky
I know nothing about quilting. I did find a trick to make nice triangles so thats what I used. Cut lots of squares, draw a line across the diagonal, pin right sides together then sew either side of the line. Cut along your line and there you have it, 2 pairs of triangles.
I lined the back with fleece to make it nice and snugly and added the ribbon. I didn't use any batting as I decided it was thick enough. Then I top stitched it following the triangles.
Grace loves them and as we have two, one lives in the nappy bag and keeps her entertained when we are out. It's also quite absorbent - which is useful!
Saturday, 26 November 2011
quickie
The problem with cloth nappies is that you end up going for trousers the next size up to get the width but then the legs are far too long. As these are so easy, and have plenty of room for customization, I think I'll run a few more up. Assuming Grace ever naps again.....
finished
At last I have finally finished the baby book for Grace. I started it the first day of my maternity leave thinking I'd have at least a week to finish it before she arrived. Little did I know that all the talk of first babies being late wasn't going to apply to Grace, she arrived that night. I think all the bending and stretching to get down on the floor to cut things out helped her on her way.
So after 11 weeks of doing one seam at a time in the breaks when Grace sleeps, I finally finished the book. I wasn't very happy with the book I made for Rose, the pages stuck out form the cover. This time I made the internal pages smaller. Even then it was tight and I had to reduce the thickness of the batting otherwise they would have stuck out.
I am really pleased with the designs, they all worked really well. The butterfly has nice soft corduroy on the back of the wing that lifts up and the dragonfly has cellophane sewn into the wings to make them crinkly.


So after 11 weeks of doing one seam at a time in the breaks when Grace sleeps, I finally finished the book. I wasn't very happy with the book I made for Rose, the pages stuck out form the cover. This time I made the internal pages smaller. Even then it was tight and I had to reduce the thickness of the batting otherwise they would have stuck out.
I am really pleased with the designs, they all worked really well. The butterfly has nice soft corduroy on the back of the wing that lifts up and the dragonfly has cellophane sewn into the wings to make them crinkly.

Subscribe to:
Posts (Atom)


